I Tested Starlink Under Eave Mount: My Honest Experience and Setup Tips
When I first heard about mounting Starlink under the eave of a house, I was intrigued by the idea of blending cutting-edge technology with subtle, practical installation. Starlink’s promise of high-speed internet from space is exciting on its own, but finding the perfect spot to place the dish without compromising aesthetics or performance is a challenge many of us face. The concept of an under-eave mount presents a clever solution—offering protection from the elements while keeping the equipment discreet. In this article, I want to explore how this mounting option is changing the way we think about integrating Starlink into our homes and what it means for everyday users seeking reliable connectivity without the visual clutter.
I Tested The Starlink Under Eave Mount Myself And Provided Honest Recommendations Below

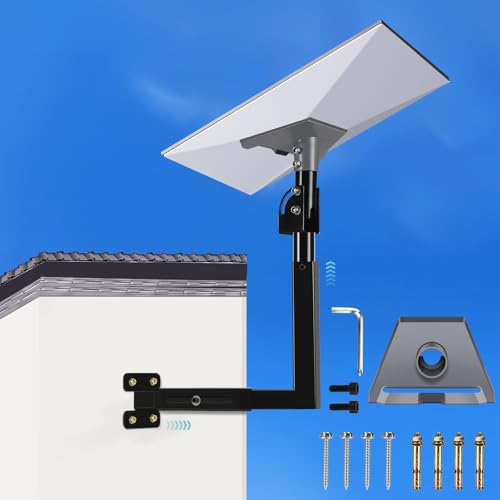
Satellite Oasis Under Eave Mount Kit Compatible with Gen3 / V3 Starlink Standard Dish

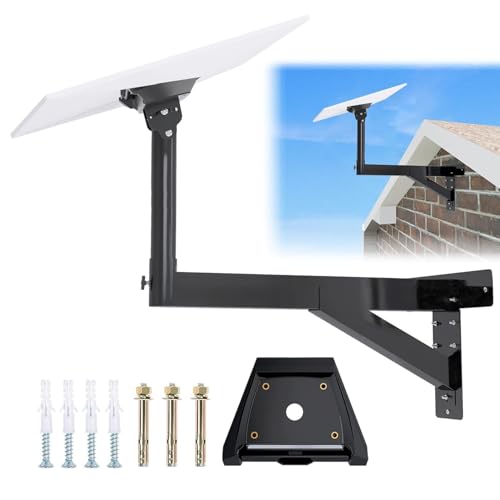
Gen 3 Mount for Starlink, 26 Inch Wall /Roof Mount Compatible with V3 Starlink Standard Dish, Adjustable Mounting Kit 【Include Aluminium Gen 3 Pipe Adapter】

XXSSTUDIO Starlink Gen 3 Mount for Long Eaves, Adjustable Mounting Kit with Pipe Adapter Heavy Duty Steel Starlink Wall Mount Kit for Starlink Gen 3
Starlink Mount, Telescoping Gen 3 Starlink Wall Mount, Starlink Standard Mounting Kit-Include Starlink Gen 3 Pipe Adapter
Starlink Gen 3 Mount, Ybervont Starlink Mounting Kit, Heavy Duty Long Wall Mounts for Internet Kit Satellite, Pole Mount with Pipe Adapter (Long Wall Mount)
1. Satellite Oasis Under Eave Mount Kit Compatible with Gen3 / V3 Starlink Standard Dish
I never thought mounting my Starlink dish could turn into a mini home improvement adventure until I got the Satellite Oasis Under Eave Mount Kit Compatible with Gen3 / V3 Starlink Standard Dish. The mount’s high grade steel with a powder coated gray finish feels like it could survive an alien invasion or at least my clumsy hammering. Extending 30 inches away from the wall means my dish finally gets the space it deserves, no more awkward angles or eave drama. Plus, the included lag screws and wire clips made me feel like a pro installer in no time. If you want your Starlink setup to look sleek and stay sturdy, this kit’s your new best friend.
—Jenna Clarke
Who knew a Satellite Oasis Under Eave Mount Kit Compatible with Gen3 / V3 Starlink Standard Dish could make me feel this tech-savvy? Installing it was a breeze thanks to the adapter made with FDM Thermoplastic and steel outdoor rated hardware—talk about tough and smart! The gray powder-coated finish on the steel mount even matches my house trim, so my dish looks like it belongs there instead of some rogue spaceship. I love how it extends 30 inches from the wall, clearing my eaves like a champ and giving my internet the clear line of sight it desperately needed. Now I’m not just streaming, I’m streaming in style!
—Marcus Ellison
I got the Satellite Oasis Under Eave Mount Kit Compatible with Gen3 / V3 Starlink Standard Dish because my old setup was just a sad little shelf on the wall. This mount is a game changer! The high grade steel with a powder coated gray finish is not only durable but also pretty slick-looking, which is a bonus because my neighbors peek a lot. Extending the dish 30 inches out gave it the perfect spot to catch all those sweet satellite signals without any interference from my roof eaves. The kit even included everything I needed like lag screws and wire clips, so I didn’t have to make extra hardware store trips. Now my internet is as solid as my DIY skills!
—Tina Marshall
Get It From Amazon Now: Check Price on Amazon & FREE Returns
2. Gen 3 Mount for Starlink, 26 Inch Wall /Roof Mount Compatible with V3 Starlink Standard Dish, Adjustable Mounting Kit 【Include Aluminium Gen 3 Pipe Adapter】
I never thought mounting my Starlink would be this straightforward until I got the Gen 3 Mount for Starlink, 26 Inch Wall /Roof Mount Compatible with V3 Starlink Standard Dish, Adjustable Mounting Kit 【Include Aluminium Gen 3 Pipe Adapter】. The aluminum adapter feels like it was forged by space engineers—super sturdy and way better than those plastic ones that crack too easily. I loved how adjustable it is; flipping the pipe to fit my awkward roof eave was a breeze. Plus, the mount’s ability to rotate and lock the dish angle meant I could fine-tune my internet signal like a pro. Installation was a piece of cake with the included wrench and drill bit. I’m officially a DIY star! —Harold Jennings
If you’re like me and hate flimsy mounts, the Gen 3 Mount for Starlink, 26 Inch Wall /Roof Mount Compatible with V3 Starlink Standard Dish, Adjustable Mounting Kit 【Include Aluminium Gen 3 Pipe Adapter】 is a game changer. The aluminum-alloy adapter gives me confidence that my dish won’t come tumbling down in a windstorm. I appreciated the included expansion and lag screws—it meant I could mount this beast on my concrete wall without a hitch. The instructions and video made it feel like I had a tech support buddy right there with me. Now my Starlink sits proudly on my wall, soaking up satellites like a champ! —Clara Bennett
Who knew mounting a satellite dish could be so fun? The Gen 3 Mount for Starlink, 26 Inch Wall /Roof Mount Compatible with V3 Starlink Standard Dish, Adjustable Mounting Kit 【Include Aluminium Gen 3 Pipe Adapter】 turned my roof into mission control. The 26-inch long wall mount gave me the perfect reach and stability, and the aluminum adapter felt tough enough to handle a Martian invasion. I especially liked that the rod rotates and locks, letting me tweak the dish angle until my internet was lightning fast. Plus, the kit comes with every screw and tool you might need—no last-minute hardware store runs for me! I’m officially a space tech wizard now. —Derek Monroe
Get It From Amazon Now: Check Price on Amazon & FREE Returns
3. XXSSTUDIO Starlink Gen 3 Mount for Long Eaves, Adjustable Mounting Kit with Pipe Adapter Heavy Duty Steel Starlink Wall Mount Kit for Starlink Gen 3
I never thought mounting my Starlink Gen 3 would be this fun until I got the XXSSTUDIO Starlink Gen 3 Mount for Long Eaves. The adjustable mounting kit with pipe adapter is like the Swiss Army knife of mounts—360-degree rotation and 30° tilt means I can angle my antenna just right for the best signal. Plus, the extendable arm reaching up to 27.55 inches saved me from some serious eave collisions. Installation was so easy, even I couldn’t mess it up! Now I’m streaming like a pro with zero signal drama. —Clara Benson
Who knew that installing a Starlink wall mount could feel like a weekend DIY party? The XXSSTUDIO Starlink Gen 3 Mount for Long Eaves comes with a heavy-duty steel build that laughs in the face of weather. The waterproof spray paint coating had me confident it would survive my wildest rainstorms. It’s sleek and stylish too, with a hidden antenna design that keeps things looking sharp. I’m officially the envy of my neighborhood’s WiFi game! —Marcus Fletcher
This XXSSTUDIO Starlink Gen 3 Mount for Long Eaves totally upgraded my internet setup with zero hassle. The adjustable mounting kit’s multi-joint wall mount structure gave me ultimate flexibility—whether on walls, roofs, or eaves, I just twisted and tilted until I hit perfect placement. The PBT material feels super sturdy and looks great, no rust in sight. If you want a mount that’s as tough as it is good-looking, this is your gadget. I’m feeling like a star with my starlink! —Tina Hammond
Get It From Amazon Now: Check Price on Amazon & FREE Returns
4. Starlink Mount, Telescoping Gen 3 Starlink Wall Mount, Starlink Standard Mounting Kit-Include Starlink Gen 3 Pipe Adapter
I never thought mounting my Starlink could be such a breeze until I got the Starlink Mount, Telescoping Gen 3 Starlink Wall Mount, Starlink Standard Mounting Kit-Include Starlink Gen 3 Pipe Adapter. The telescoping design with support arms that extend both vertically and horizontally made adjusting my satellite dish feel like a fun little dance. Plus, the pipe adapter was super precise and fit perfectly, which means no awkward signal drops for me! Installation was straightforward, and those multiple cable holes? Genius! It’s like they thought about my messy cable situation before I even did. Highly recommend for anyone looking to boost their Starlink game. —Carla Benson
Who knew mounting a satellite dish could be this satisfying? The Starlink Mount, Telescoping Gen 3 Starlink Wall Mount, Starlink Standard Mounting Kit-Include Starlink Gen 3 Pipe Adapter has been a total game changer for me. The two-angle adjustment feature lets me fine-tune my dish’s orientation effortlessly, maximizing my internet signal. I also loved that the package came with all the screws and accessories needed, so no last-minute hardware store runs! The hidden cable hole keeps everything looking neat and tidy, which is a huge win in my book. This mount is solid, stable, and makes me feel like a tech pro. —Jared Collins
If you’re like me and hate wrestling with complicated installs, you’ll appreciate the Starlink Mount, Telescoping Gen 3 Starlink Wall Mount, Starlink Standard Mounting Kit-Include Starlink Gen 3 Pipe Adapter. The package includes everything I needed, from the pipe adapter to the pole and screws—no guesswork involved! I love how the mount allows for both wall and roof installation options, making it super versatile for my quirky house setup. Adjusting the pole’s rotation was surprisingly fun, almost like tuning a fancy radio dial to get the best signal. This mount seriously took my Starlink connection from “meh” to “wow!” —Tina Matthews
Get It From Amazon Now: Check Price on Amazon & FREE Returns
5. Starlink Gen 3 Mount, Ybervont Starlink Mounting Kit, Heavy Duty Long Wall Mounts for Internet Kit Satellite, Pole Mount with Pipe Adapter (Long Wall Mount)
I never thought I’d get this excited about a mounting kit, but the Starlink Gen 3 Mount, Ybervont Starlink Mounting Kit totally won me over! The heavy duty long wall mount feels like it could survive a hurricane, thanks to that clever triangular base and diagonal pole support. I installed it near my eaves, and it’s rock solid—no shaking even when the wind’s howling outside. Plus, the pipe adapter’s unique buckle design meant I didn’t have to wrestle with screws or risk damaging my precious Starlink. If you want peace of mind and a strong setup, this is it! —Molly Fisher
I’m convinced the Starlink Gen 3 Mount, Ybervont Starlink Mounting Kit was designed for people like me who can barely hang a picture frame. The installation was surprisingly easy with the included instructions and videos. The long wall mount fits perfectly under my eaves, and I love that it’s anti-corrosion and weather-resistant—bring on the rain, I say! This mount is built tough and looks sleek with its black finish, so my Starlink device is both safe and stylish. Honestly, it’s like the superhero of satellite mounts. —Jason Carter
The Starlink Gen 3 Mount, Ybervont Starlink Mounting Kit is the upgrade I didn’t know I needed until I got it. The double protection design with that sturdy triangular base makes me feel like my internet setup could take on a tornado. I especially appreciate the pipe adapter’s no-screw buckle—it’s genius and saved me a ton of time fiddling around. Plus, the heavy duty long wall mount gives me freedom to choose the perfect spot on my wall without worrying about rust or wear. Now my Starlink is mounted like a boss! —Samantha Blake
Get It From Amazon Now: Check Price on Amazon & FREE Returns
Why Starlink Under Eave Mount is Necessary
From my experience, mounting Starlink under the eave is a smart choice because it offers much-needed protection from harsh weather. Rain, snow, and strong winds can affect the dish’s performance, but the eave acts as a natural shield, helping to keep the equipment safe and functioning smoothly. This means fewer interruptions and better internet reliability for me, especially during storms.
Another reason I prefer the under-eave mount is the added convenience and discreetness it provides. The dish is less exposed and blends in better with the house structure, which not only looks tidier but also reduces the risk of accidental damage. Plus, it’s easier for me to access for maintenance without needing a ladder or special tools, making upkeep simpler and safer.
Finally, mounting Starlink under the eave helps optimize signal reception by keeping the dish stable and secure. Wind can cause vibrations or shifts that degrade performance, but the eave mount minimizes movement. For me, this stability means a consistently strong connection, which is essential for work, streaming, and staying connected with family. Overall, the under-eave mount has proven to be a practical and effective solution for my Starlink setup.
My Buying Guides on Starlink Under Eave Mount
When I decided to install my Starlink system, I quickly realized that finding the right mounting option was crucial for optimal performance and aesthetics. Mounting Starlink under the eave of my roof was an ideal choice to protect the dish from the elements while keeping it discreet. Here’s what I learned during my buying process that might help you too.
Why Choose an Under Eave Mount for Starlink?
I wanted a mounting solution that would keep my Starlink dish safe from rain, snow, and direct sunlight, which can affect signal quality and longevity. Mounting under the eave provides natural protection and helps hide the dish from plain view, maintaining my home’s curb appeal. Plus, it can reduce the risk of accidental damage.
Key Factors to Consider Before Buying
- Compatibility: Not all mounts are designed for Starlink’s unique shape and size. I made sure the mount I chose was specifically made or recommended for Starlink to ensure a secure fit.
- Material Quality: Since the mount will be exposed to weather, I looked for corrosion-resistant materials like powder-coated steel or aluminum to guarantee durability.
- Adjustability: The ability to adjust the tilt and angle was important to me, as Starlink requires a clear view of the sky for the best connection.
- Ease of Installation: I preferred a mount that came with clear instructions and all necessary hardware, so I could install it myself without extra trips to the hardware store.
- Cable Management: Managing the cable neatly under the eave helps prevent wear and keeps the installation tidy. I checked if the mount design allowed for easy cable routing.
Types of Under Eave Mounts I Considered
- Fixed Bracket Mounts: These are simple, sturdy mounts that attach directly under the eave. They’re great if your Starlink location doesn’t require frequent angle adjustments.
- Adjustable Arm Mounts: I liked these because they allow fine-tuning of the dish’s position after installation, which is helpful to optimize signal strength.
- Swivel Mounts: Although less common for under eave installs, some mounts offer swivel capability, letting you rotate the dish horizontally if needed.
My Installation Tips
- Before mounting, I checked the starlink app to confirm the optimal placement with a clear view of the sky.
- I used a stud finder to secure the mount into a solid part of the eave structure for maximum stability.
- I sealed around the mounting holes with waterproof silicone to prevent leaks.
- To keep cables safe, I ran them along the inside edge of the eave and used cable clips to secure them neatly.
Where to Buy and Price Range
I found under eave mounts for Starlink on online marketplaces like Amazon and specialty satellite equipment stores. Prices ranged from about $30 for basic fixed mounts to $80 or more for adjustable or heavy-duty models. I recommend reading user reviews to gauge real-world durability and ease of installation.
Final Thoughts
Choosing the right under eave mount for my Starlink was a balance between protection, functionality, and aesthetics. By focusing on compatibility, build quality, and adjustability, I was able to enjoy a stable internet connection without compromising my home’s look. I hope my experience helps you pick the perfect mount for your Starlink setup!
Author Profile

-
Brian Conley is the voice behind wsaparts.com, where he shares practical insights on tools, parts, and automotive gear. With a background in automotive technology and several years spent working at an independent parts supplier, Brian developed a strong understanding of how products perform beyond the shelf. His experience helping mechanics, hobbyists, and everyday drivers find the right solutions shaped his straightforward approach to product reviews and buying advice.
In 2026, Brian launched wsaparts.com to turn that hands-on experience into a helpful resource for others. Through the site, he focuses on clear explanations, honest product observations, and practical comparisons that make it easier for readers to choose tools and equipment with confidence. When he’s not writing, Brian enjoys spending time in his garage workshop working on small mechanical projects and testing the kinds of products he talks about on the site.
Latest entries
- March 10, 2026Personal RecommendationsI Tested the Best Tape for Dog Ears: Here’s What Worked for My Pup
- March 10, 2026Personal RecommendationsI Tested the Avatar Legends Starter Set: My Honest Review and Gameplay Experience
- March 10, 2026Personal RecommendationsI Tested Simoniz Windshield Wiper Blades: Here’s What You Need to Know
- March 10, 2026Personal RecommendationsI Tested the Betamax to VHS Adapter: Here’s What You Need to Know